Storing your sewing machine.
Many sewing machines spend most of their time parked, only coming out for that special job. Even for keen hobbyists, sometimes circumstances dictate that they won’t be used for a while. Where you keep your machine in these periods can make a big difference to how it will behave when pressed into service. Avoid damp areas, especially the laundry, as rust will quickly set in and damage the machine, often to the point where the machine cannot be repaired. Hot areas can be similarly bad as the light oils used in your sewing machine will dry out.When bringing your machine out of storage, turn the flywheel by hand to ensure that it is moving freely. Oil any available oiling points as described in your manual. If the machine is heavy to turn by hand, take it to your local sewing centre for a service – they will be able to lubricate the internal bearings where your owner’s manual maintenance can’t reach.
Oils ain’t oils
As the boss told Sol in the old Castrol ad’s, the same applies with sewing machines. The shafts in sewing machines run at high speeds in bearings with small clearances. This means that they require light weight, high grade oils. Only use sewing machine oil. Never consider vegetable oil and the like as substitutes – they will gum up your machine, without lubricating those bearings.
Tangles
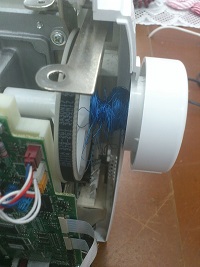
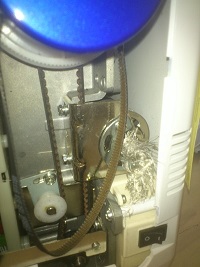
Typically we see 2 types of tangles in the workshop. The first type I will call a flywheel tangle. This tends to occur when thread is fed from behind or alongside the machine, rather than from the provided spool holders. Sometimes it simply builds up on the shaft behind the flywheel, which is generally not too serious.
The flywheel tangle can get a whole lot worse though. In this case the thread became caught in the drive belt, pulled down to the motor shaft, wrapped around that, smashing the cooling fan, then stretched and displaced the belt before the owner became aware of what was happening, which isn’t necessarily very long when your machine is running at 1,000 stitches per minute.
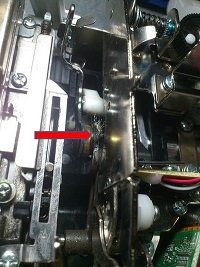
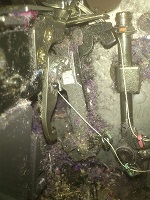
The second type of tangle is in the take up lever mechanism and far more common. These tangles seem to occur when the threading does not pass correctly through the tension disks, leaving the upper thread loose.
This then allows the thread to become caught in the pivot of the take up lever. If left in place these tangles can cause a seizure of their own, and at the minimum will dry out the lubricant from the pivot.If you catch these tangles soon enough, and can get to the thread with a pair of tweezers, it is sometimes possible to clear them.
Turn the machine off. Remove the bobbin, bobbin case and needle. Gripping the end of the thread, use the flywheel to slowly turn the machine backwards (never attempt this with a Babylock Sashiko machine) and unwind the tangle. If you can’t get it this way, bring your machine in and we will dismantle the take up lever and clear it during servicing
240 into 110 doesn’t go
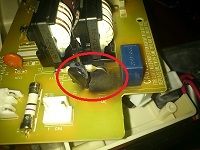
The favourable exchange rate against the US dollar throughout 2013, in conjunction with a national dealer advertising a "US market only” model in Australia, which they were retro fitting with an appropriate power supply, saw a bit of a spate of 110 volt market machines appearing for service. I’ve always been reluctant to touch these (and it is now my policy that I won’t) – I can’t guarantee that someone isn’t going to pick up a compatible power cord (the machine end of the cord is the same) and plug it into a 240 volt power outlet instead of their 240 volt to 110 volt converter.When that happens we tend to see a result like the image opposite, where a capacitor has blown up. Note the scorching on the board and also consider that the shroud over the board had signs of burns. This machine had actually been on fire. The owner didn’t know how lucky they were. If you are looking at a machine which was not manufactured for the Australian domestic market, check the voltage rating which will be on a label on the back of the machine. If it reads "110v – 240v”or "220v - 240v” it should be OK, but if it doesn’t have an Australian Standards approval, you might want to check your insurance policy before parting with your money. If the label reads "110v”, consider the image opposite.
Clean me (please)
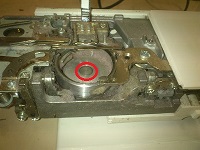
Like most machines, your sewing machine will work much better when it is clean. A build-up of lint in the hook area can interfere with the operation of the feed dogs and the bobbin sensor. In extreme cases, it can even cause a seizure of the hook gear. We will thoroughly clean this area as part of normal servicing, but you can cut down on the build-up between services by removing the inner hook (bobbin case) and needle plate every few bobbin changes and giving the area a sweep with the accessory brush.While you’re there, put a drop of oil on the edge of the centre pin of the hook(circled).
Overlockers
Overlockers,or sergers, need some love too! Generally speaking, if a cover can be opened without tools, or the manufacturer has supplied a tool to remove it (e.g. needle plate screws), it is a good idea to periodically open the cover and give the area a bit of a clean-up. Just brushing the lint out of there will make a difference.
Quick fixes for common problems
How long since you last changed your needle? The one in your machine probably still feels sharp, but after a few hours of sewing, they do go blunt. At around $1 each, a new needle can make a world of difference to your sewing at a budget price. The first thing you will notice will be the sound your machine makes –it will be noticeably quieter with a new needle. You don’t notice the noise level increasing as the needle blunts slowly as you work, but when you go from a blunt needle to a sharp one, the change is immediate. Other advantages tend to be finer holes in your work and no skipped stitches. And, when you replace your needle, dispose of the old one, don’t save it for a rainy day. We use an old fruit jar with a hole drilled in the lid to dispose of needles whilst servicing. You probably won’t be disposing of as many needles as we do, but you can do the same on a smaller scale.
While I'm on skipped stitches, check our needle selection chart to make sure you are using the correct needle for the job. Incorrect needle selection is often the cause of skipped stitches. If you are using the correct needle and still skipping stitches it may mean that the needle clearance or timing has drifted and a service will be needed to correct it.
If you are having trouble with tensions, before you start furiously adjusting things, take a deep breath, stand up and walk away from the machine. Come back and unthread the needle and remove the bobbin. Place the bobbin back into the machine and replace the bobbin cover. Rethread the top from the beginning, all the way through the thread path making sure that you pass correctly through the pre-tension and tension disks. Try again. You will be surprised how often we find a threading error is the source of tension problems.
If your machine is not sensing that the bobbin is nearly empty, it is commonly resolved by removing the needle plate and inner hook (bobbin case) and giving the inside and outside of the outer hook a clean with a brush. See the picture in "Clean me (please) ” above for a typical build-up of lint from quilting work. This lint blocks the line of sight of the sensor and it interprets that to mean that the bobbin is full.